基于 Node-RED 的自定义TCP协议通信实现
1 前言
本文基于钡铼技术 ARMxy 内置 Node-RED 平台,以一个典型的自定义 TCP 协议为例,演示完整的协议开发流程,包括业务报文组包、TCP 通信、协议解析以及心跳保活功能,帮助读者快速掌握自定义 TCP 协议的实现方法。
2 自定义TCP协议报文格式
本教程以某设备的自定义 TCP 协议作为示例,采用固定帧结构二进制报文进行通信,协议由帧头、指令码、数据长度、数据区、校验码和帧尾组成,其中校验方式采用 XOR(异或校验)。
2.1 完整报文帧格式
协议报文遵循严格的字节顺序和长度定义,确保通信双方正确解析。各字段含义如下:
| 字段 | 字节长度(Byte) | 示例 |
|---|---|---|
| 帧头1 | 1 | AA |
| 帧头2 | 1 | 55 |
| 指令 | 1 | 01 |
| 数据长度 | 1 | 02 |
| 数据区 | N | 10 20 |
| 校验码 | 1 | XOR |
| 帧尾1 | 1 | 0D |
| 帧尾2 | 1 | 0A |
- 帧头 (AA 55):标识报文开始,用于接收方同步解析。
- 指令码:表示操作类型,如业务查询(01)或心跳保活(FF)。
- 数据长度:指示后续数据区所占字节数。
- 数据区:携带实际业务数据,长度可变。
- 校验码:对前所有字节执行 XOR 运算得出,用于验证数据完整性。
- 帧尾 (0D 0A):标识报文结束,常用于兼容串口通信习惯。
2.2 标准报文示例
根据上述格式,构造典型应用场景下的完整报文:
- 业务查询指令完整报文:
AA 55 01 02 10 20 CC 0D 0A- 含义:发送一条业务指令(01),数据长度为2字节(10 20),校验码CC由前7字节异或计算得出。
- 心跳保活指令完整报文:
AA 55 FF 00 XX 0D 0A- 含义:发送心跳指令(FF),无数据(长度00),校验码XX为动态计算值,确保每次心跳包内容唯一,有效防止重放攻击。
3 整体流程架构
3.1 整体流程图

3.2 业务通信流程
定时触发 → 报文组包 → TCP发送 → 数据接收 → 协议解析 → 结构化数据输出
节点流转链路:Inject节点 → 业务组包Function节点 → TCP Request节点 → 协议解析Function节点 → Debug节点
3.3 心跳保活流程
定时周期触发 → 心跳报文组包 → TCP发送 → 设备保活
节点流转链路:3s周期Inject节点 → 心跳组包Function节点 → TCP Request节点→ 分流Function节点
4 核心节点配置
4.1 TCP Request节点核心配置
首先拖入 TCP Request 节点,配置如下:
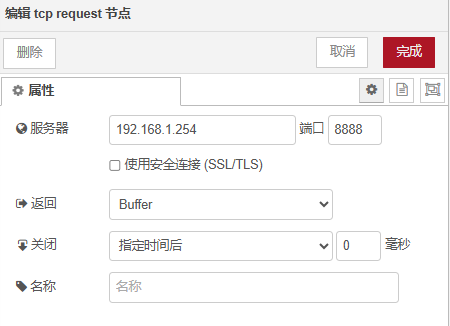
本教程使用网络调试助手模拟 TCP Server,Node-RED 作为 TCP Client 与其建立连接。实际应用时,将服务器地址和端口修改为设备实际参数即可。
4.2 Inject节点配置
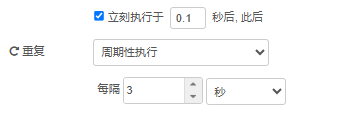
开启Repeat循环模式。
5 报文组包脚本实现
5.1 业务报文组包
用于发送设备业务查询指令,固定报文格式,直接生成可发送的二进制Buffer数据:
// 组业务帧
msg.payload = Buffer.from([
    0xAA,   // 帧头1
    0x55,   // 帧头2
    0x01,   // 指令
    0x02,   // 数据长度
    0x10,   // 数据1
    0x20,   // 数据2
    0xCC,   // 校验
    0x0D,   // 帧尾1
    0x0A    // 帧尾2
]);
msg.request_type = "business";
return msg;
该脚本构建了完整的业务查询报文 AA 55 01 02 10 20 CC 0D 0A,其中校验码 CC 为前7字节异或计算结果,确保数据完整性。
5.2 心跳报文组包
心跳包采用动态XOR校验,自动计算校验值,适配设备保活协议要求:
// 配置
const TIMEOUT_THRESHOLD = 15000;
// 在线状态检测
let lastOnline = global.get("device_last_online") || Date.now();
let now = Date.now();
if (now - lastOnline > TIMEOUT_THRESHOLD) {
    node.status({ fill: "red", shape: "ring", text: "设备离线" });
} else {
    node.status({ fill: "green", shape: "dot", text: "设备在线" });
}
// 组装标准心跳帧
const frame = [
    0xAA,   // 帧头1
    0x55,   // 帧头2
    0xFF,   // 心跳指令码
    0x00,   // 数据长度
];
// 动态计算XOR校验
let checksum = 0;
for (let i = 0; i < frame.length; i++) {
    checksum ^= frame[i];
}
frame.push(checksum);
// 追加帧尾
frame.push(0x0D);
frame.push(0x0A);
msg.payload = Buffer.from(frame);
msg.request_type = "heartbeat";
return msg;
6 设备返回报文解析实现
TCP Request 节点收到设备响应后,通过 Function 节点按照“帧头→帧尾→校验→字段解析”的顺序逐步解析报文,并最终输出 JSON 格式数据,实现从原始二进制流到结构化信息的转换。
6.1 解析节点配置
let buf = msg.payload;
// 空数据或超时保护
if (!buf || buf.length < 7) {
    node.warn("响应数据无效");
    global.set("tcp_busy", false);
    return null;
}
node.warn("HEX: " + buf.toString("hex"));
// 帧头校验
if (buf[0] !== 0xAA || buf[1] !== 0x55) {
    node.error("Header Error");
    return null;
}
// 帧尾校验
if (buf[buf.length - 2] !== 0x0D || buf[buf.length - 1] !== 0x0A) {
    node.error("Tail Error");
    return null;
}
// 解析字段
let cmd = buf[2];
let len = buf[3];
let data = buf.slice(4, 4 + len);
let recvChecksum = buf[4 + len];
// XOR校验
let calc = 0;
for (let i = 0; i < 4 + len; i++) {
    calc ^= buf[i];
}
if (calc !== recvChecksum) {
    node.error("Checksum Error");
    return null;
}
// 任何有效帧都刷新在线时间
global.set("device_last_online", Date.now());
// 心跳帧分流,不输出
if (cmd === 0xFF) {
    node.status({ fill: "green", shape: "dot", text: "心跳应答正常" });
    return null;
}
// 业务帧输出
msg.payload = {
    command: cmd,
    command_hex: "0x" + cmd.toString(16).padStart(2, "0"),
    data: Array.from(data),
    data_hex: Array.from(data).map(v =>
        "0x" + v.toString(16).padStart(2, "0")
    ),
    checksum: recvChecksum,
    checksum_hex: "0x" + recvChecksum.toString(16).padStart(2, "0")
};
return msg;
6.2 解析输出结果示例
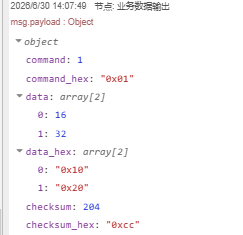
解析成功后,Debug 节点输出标准化 JSON 结构化数据,可直接用于后续逻辑开发:
7 调试与问题排查方案
在调试自定义 TCP 协议时,建议结合以下多种工具和方法验证通信过程,快速定位并解决问题:
-
Node-RED Debug节点调试: 实时查看原始Buffer数据、十六进制报文、结构化解析结果,快速定位组包错误、解析逻辑漏洞,是基础调试核心工具。
-
Wireshark抓包调试:
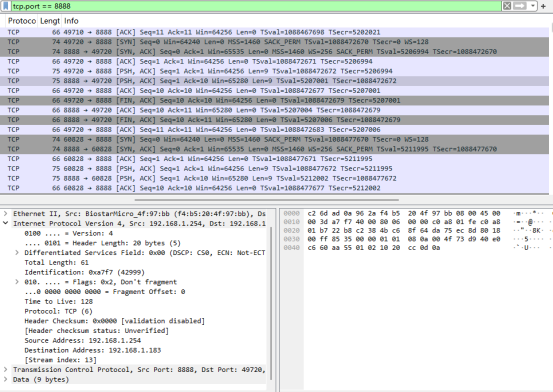
Wireshark 抓取 TCP 报文,对比发送数据与实际网络数据是否一致,定位协议问题。
- 网络调试助手对比调试: 使用NetAssist等网络调试工具,模拟TCP服务端/客户端,与Node-RED交互对比报文数据,验证组包、校验逻辑的准确性,排除设备与程序逻辑问题。
8 总结
本文通过一个典型的自定义 TCP 协议案例,介绍了 Node-RED 实现 TCP 通信的完整流程,包括协议组包、TCP 数据发送、报文解析以及心跳保活机制。实际项目中,只需根据设备协议修改报文格式和解析逻辑,即可快速适配不同厂家的 TCP 私有协议,实现设备通信与数据采集。
[
    {
        "id": "98dca524207f5965",
        "type": "function",
        "z": "2fbadff144108550",
        "name": "组业务帧",
        "func": "// 组业务帧\nmsg.payload = Buffer.from([\n    0xAA,   // 帧头1\n    0x55,   // 帧头2\n    0x01,   // 指令\n    0x02,   // 数据长度\n    0x10,   // 数据1\n    0x20,   // 数据2\n    0xCC,   // 校验\n    0x0D,   // 帧尾1\n    0x0A    // 帧尾2\n]);\n\nmsg.request_type = \"business\";\nreturn msg;",
        "outputs": 1,
        "timeout": 0,
        "noerr": 0,
        "initialize": "// 初始化全局变量\nif (!global.get(\"device_last_online\")) {\n    global.set(\"device_last_online\", Date.now());\n    global.set(\"tcp_busy\", false);\n}",
        "finalize": "",
        "libs": [],
        "x": 440,
        "y": 1020,
        "wires": [
            [
                "24480e11c4ade7a3"
            ]
        ]
    },
    {
        "id": "5bbb518cddd4c12a",
        "type": "function",
        "z": "2fbadff144108550",
        "name": "协议解析+分流",
        "func": "let buf = msg.payload;\n\n// 空数据或超时保护\nif (!buf || buf.length < 7) {\n    node.warn(\"响应数据无效\");\n    global.set(\"tcp_busy\", false);\n    return null;\n}\n\nnode.warn(\"HEX: \" + buf.toString(\"hex\"));\n\n// 帧头校验\nif (buf[0] !== 0xAA || buf[1] !== 0x55) {\n    node.error(\"Header Error\");\n    return null;\n}\n\n// 帧尾校验\nif (buf[buf.length - 2] !== 0x0D || buf[buf.length - 1] !== 0x0A) {\n    node.error(\"Tail Error\");\n    return null;\n}\n\n// 解析字段\nlet cmd = buf[2];\nlet len = buf[3];\nlet data = buf.slice(4, 4 + len);\nlet recvChecksum = buf[4 + len];\n\n// XOR校验\nlet calc = 0;\nfor (let i = 0; i < 4 + len; i++) {\n    calc ^= buf[i];\n}\n\nif (calc !== recvChecksum) {\n    node.error(\"Checksum Error\");\n    return null;\n}\n\n// 任何有效帧都刷新在线时间\nglobal.set(\"device_last_online\", Date.now());\n\n// 心跳帧分流,不输出\nif (cmd === 0xFF) {\n    node.status({ fill: \"green\", shape: \"dot\", text: \"心跳应答正常\" });\n    return null;\n}\n\n// 业务帧输出\nmsg.payload = {\n    command: cmd,\n    command_hex: \"0x\" + cmd.toString(16).padStart(2, \"0\"),\n    data: Array.from(data),\n    data_hex: Array.from(data).map(v =>\n        \"0x\" + v.toString(16).padStart(2, \"0\")\n    ),\n    checksum: recvChecksum,\n    checksum_hex: \"0x\" + recvChecksum.toString(16).padStart(2, \"0\")\n};\n\nreturn msg;",
        "outputs": 1,
        "timeout": 0,
        "noerr": 0,
        "initialize": "",
        "finalize": "",
        "libs": [],
        "x": 940,
        "y": 1080,
        "wires": [
            [
                "bb00802b168727ca"
            ]
        ]
    },
    {
        "id": "bb00802b168727ca",
        "type": "debug",
        "z": "2fbadff144108550",
        "name": "业务数据输出",
        "active": true,
        "tosidebar": true,
        "console": false,
        "tostatus": false,
        "complete": "payload",
        "targetType": "msg",
        "statusVal": "",
        "statusType": "auto",
        "x": 1140,
        "y": 1080,
        "wires": []
    },
    {
        "id": "40e98e7e110e62bf",
        "type": "inject",
        "z": "2fbadff144108550",
        "name": "业务定时触发",
        "props": [
            {
                "p": "payload"
            },
            {
                "p": "topic",
                "vt": "str"
            }
        ],
        "repeat": "3",
        "crontab": "",
        "once": true,
        "onceDelay": 0.1,
        "topic": "",
        "payload": "",
        "payloadType": "date",
        "x": 270,
        "y": 1020,
        "wires": [
            [
                "98dca524207f5965"
            ]
        ]
    },
    {
        "id": "24480e11c4ade7a3",
        "type": "tcp request",
        "z": "2fbadff144108550",
        "name": "",
        "server": "192.168.1.254",
        "port": "8888",
        "out": "time",
        "ret": "buffer",
        "splitc": "0",
        "newline": "",
        "trim": false,
        "tls": "",
        "x": 710,
        "y": 1080,
        "wires": [
            [
                "5bbb518cddd4c12a"
            ]
        ]
    },
    {
        "id": "0ad2f33d04bcb16a",
        "type": "inject",
        "z": "2fbadff144108550",
        "name": "心跳定时触发",
        "props": [
            {
                "p": "payload"
            },
            {
                "p": "topic",
                "vt": "str"
            }
        ],
        "repeat": "3",
        "crontab": "",
        "once": true,
        "onceDelay": 0.1,
        "topic": "",
        "payload": "",
        "payloadType": "date",
        "x": 270,
        "y": 1140,
        "wires": [
            [
                "bb4c78ed66e405fc"
            ]
        ]
    },
    {
        "id": "bb4c78ed66e405fc",
        "type": "function",
        "z": "2fbadff144108550",
        "name": "心跳组包",
        "func": "// 配置\nconst TIMEOUT_THRESHOLD = 15000;\n\n// 在线状态检测\nlet lastOnline = global.get(\"device_last_online\") || Date.now();\nlet now = Date.now();\n\nif (now - lastOnline > TIMEOUT_THRESHOLD) {\n    node.status({ fill: \"red\", shape: \"ring\", text: \"设备离线\" });\n} else {\n    node.status({ fill: \"green\", shape: \"dot\", text: \"设备在线\" });\n}\n\n// 组装标准心跳帧\nconst frame = [\n    0xAA,   // 帧头1\n    0x55,   // 帧头2\n    0xFF,   // 心跳指令码\n    0x00,   // 数据长度\n];\n\n// 动态计算XOR校验\nlet checksum = 0;\nfor (let i = 0; i < frame.length; i++) {\n    checksum ^= frame[i];\n}\nframe.push(checksum);\n\n// 追加帧尾\nframe.push(0x0D);\nframe.push(0x0A);\n\nmsg.payload = Buffer.from(frame);\nmsg.request_type = \"heartbeat\";\nreturn msg;",
        "outputs": 1,
        "timeout": 0,
        "noerr": 0,
        "initialize": "",
        "finalize": "",
        "libs": [],
        "x": 440,
        "y": 1140,
        "wires": [
            [
                "24480e11c4ade7a3"
            ]
        ]
    }
]